Chana Masala

It’s fall here in New York!

After the sweltering heat of the summer, fall makes me think of snuggling on the couch in sweatpants with a warming bowl of something delicious.

We’ve been trying to lean vegetarian most weeknights so I started looking around for new recipes to try. I kept coming across recipes for Chana Masala, which is a vegetarian chickpea stew. I kept looking at the recipes and shying away because it is an Indian dish and I typically don’t like certain Indian spices.

But then I realized, I’m making the dish myself. I can adjust the spices. The best part of cooking at home is the ability to modify recipes to suit your tastes.

So this is my modified Chana Masala. It’s actually vegan (if you leave off the dollop of yogurt we put on top), incredibly easy to make and one of the tastiest things to come out of our kitchen lately. Added bonus: it’s super cheap to make. Double added bonus: it’s made in one pot and the recipe makes enough for two dinners for the two of us. Major score.

  • 2 cans chickpeas
  •  1 can diced tomato (I have used fire roasted and plain. fire roasted adds a nice smoky flavor)
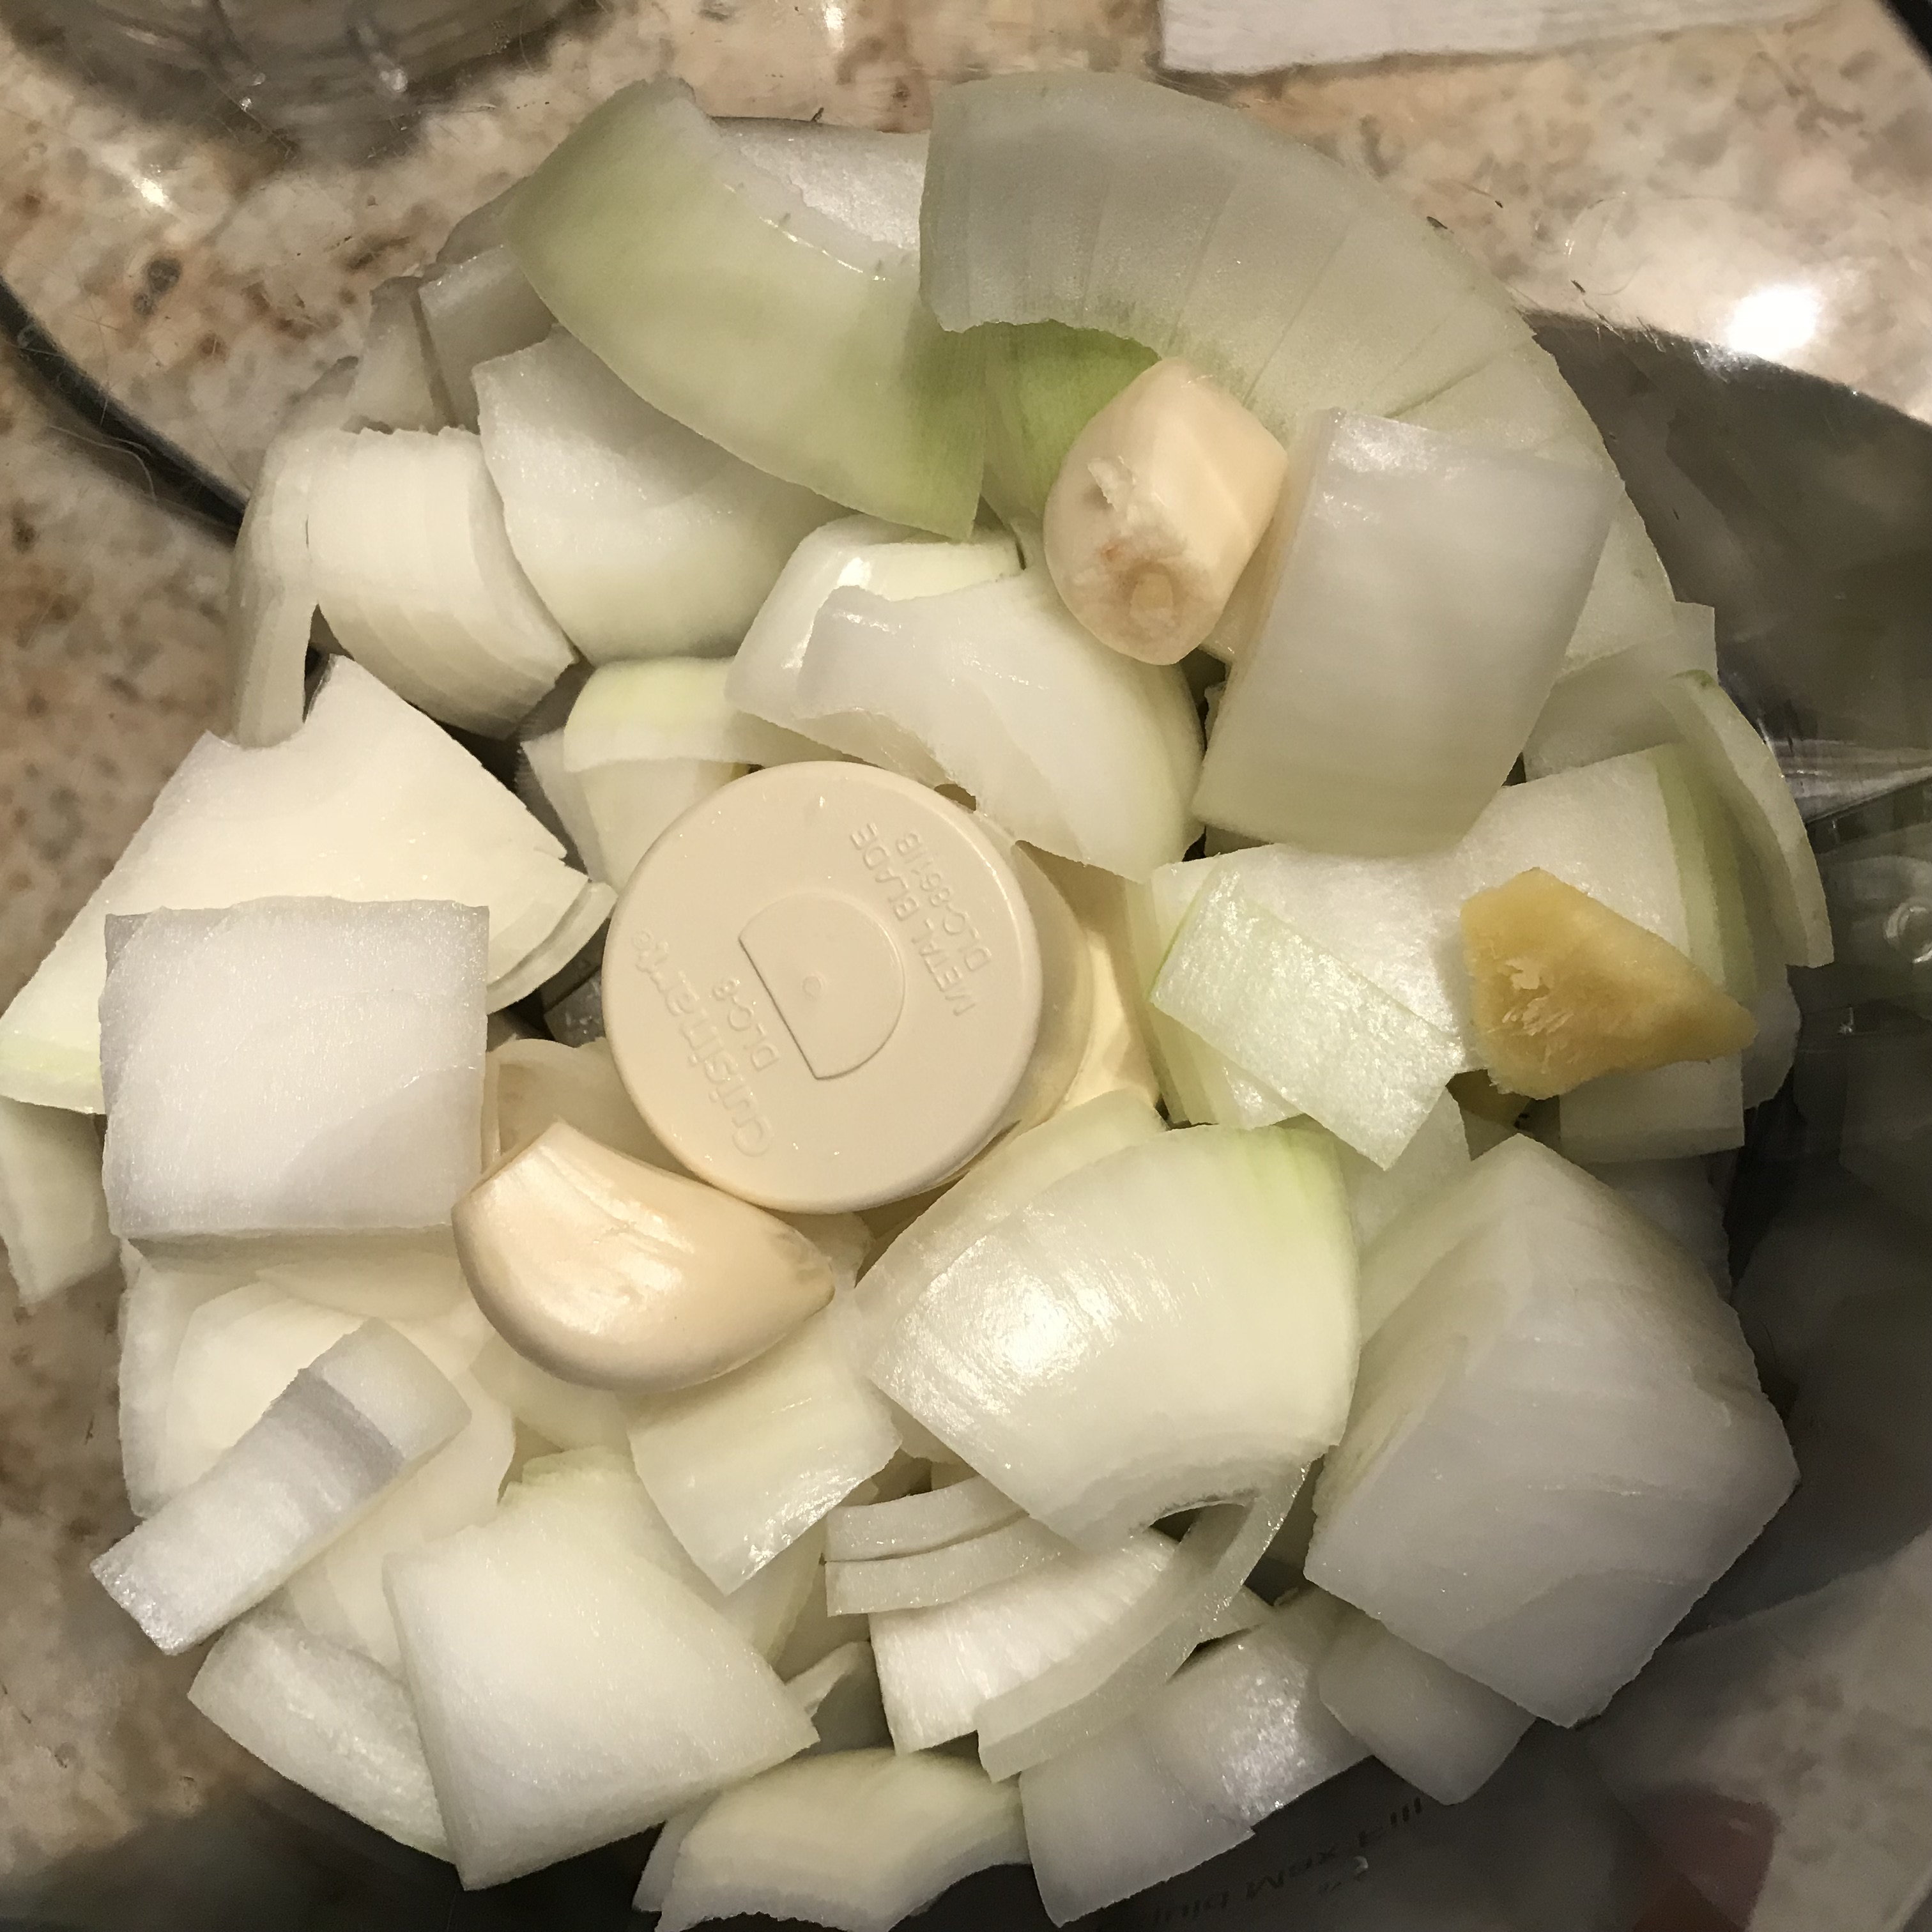
  • 1 onion
  • an inch of fresh ginger
  •  2 cloves of garlic
  • 1 tablespoon tahini
  • turmeric
  • cinnamon
  • coriander
  • salt and pepper

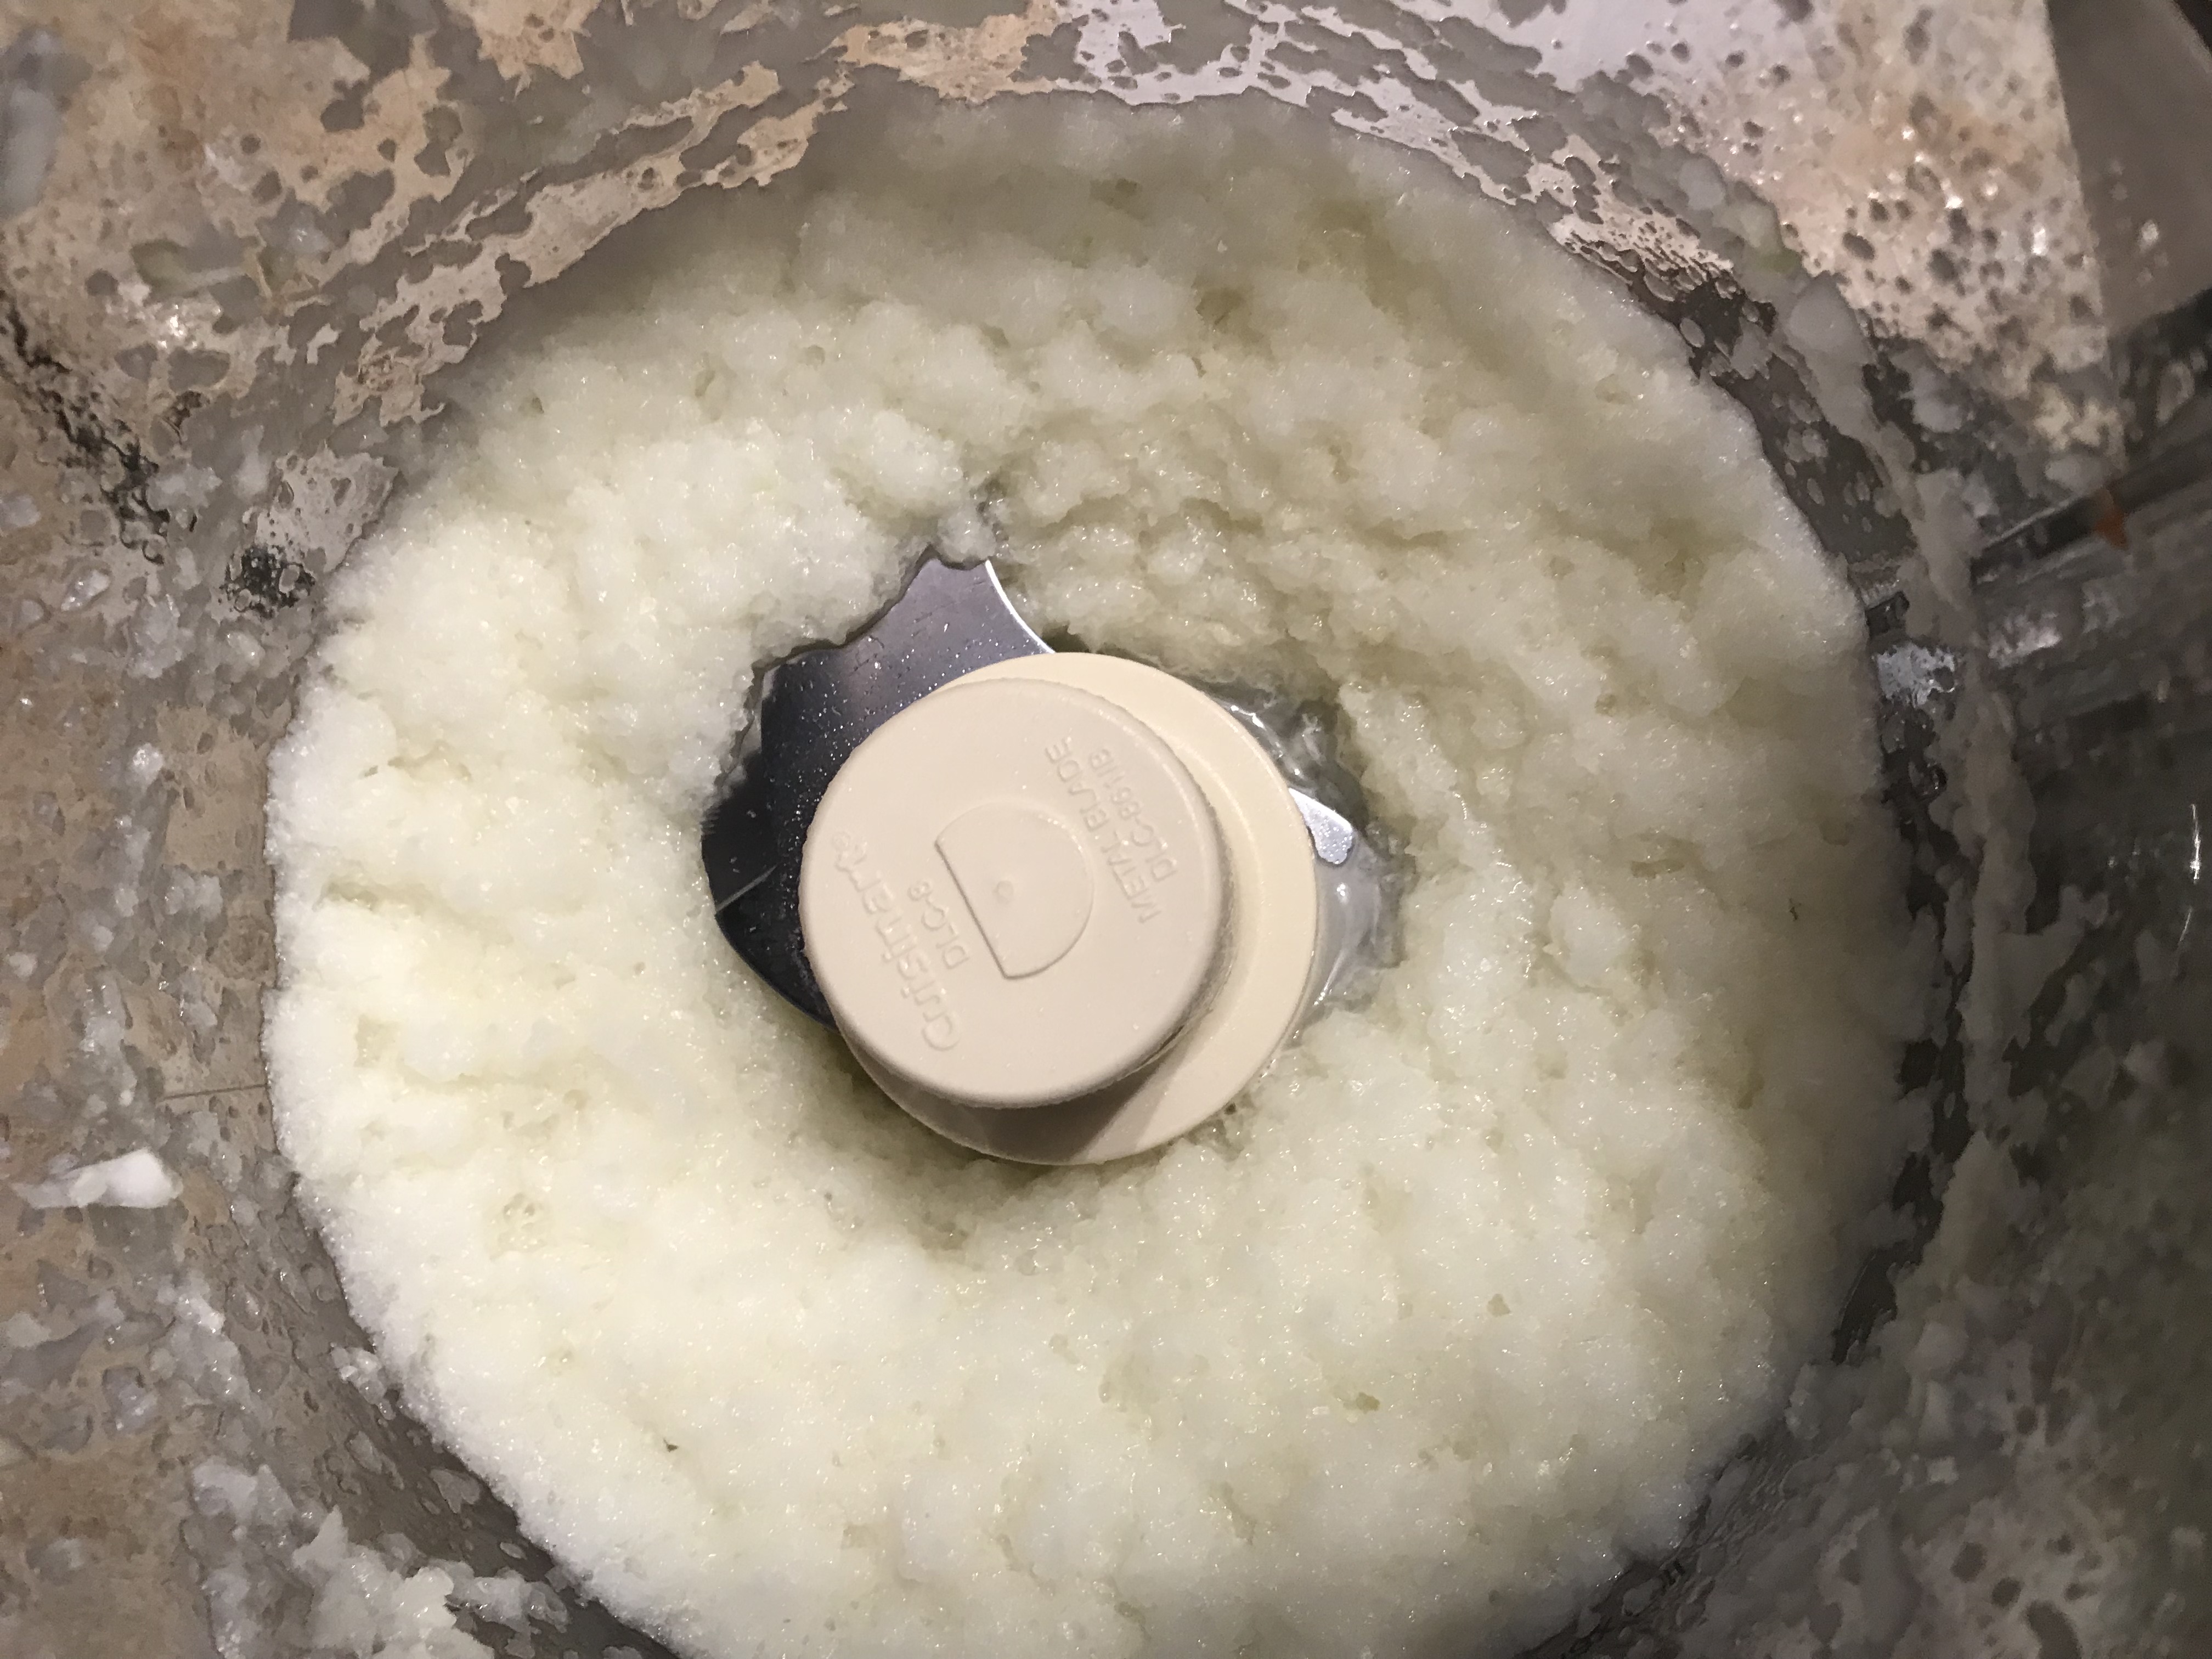
Roughly chop the onion, ginger and garlic and place in the food processor.

Blend until it forms a paste.

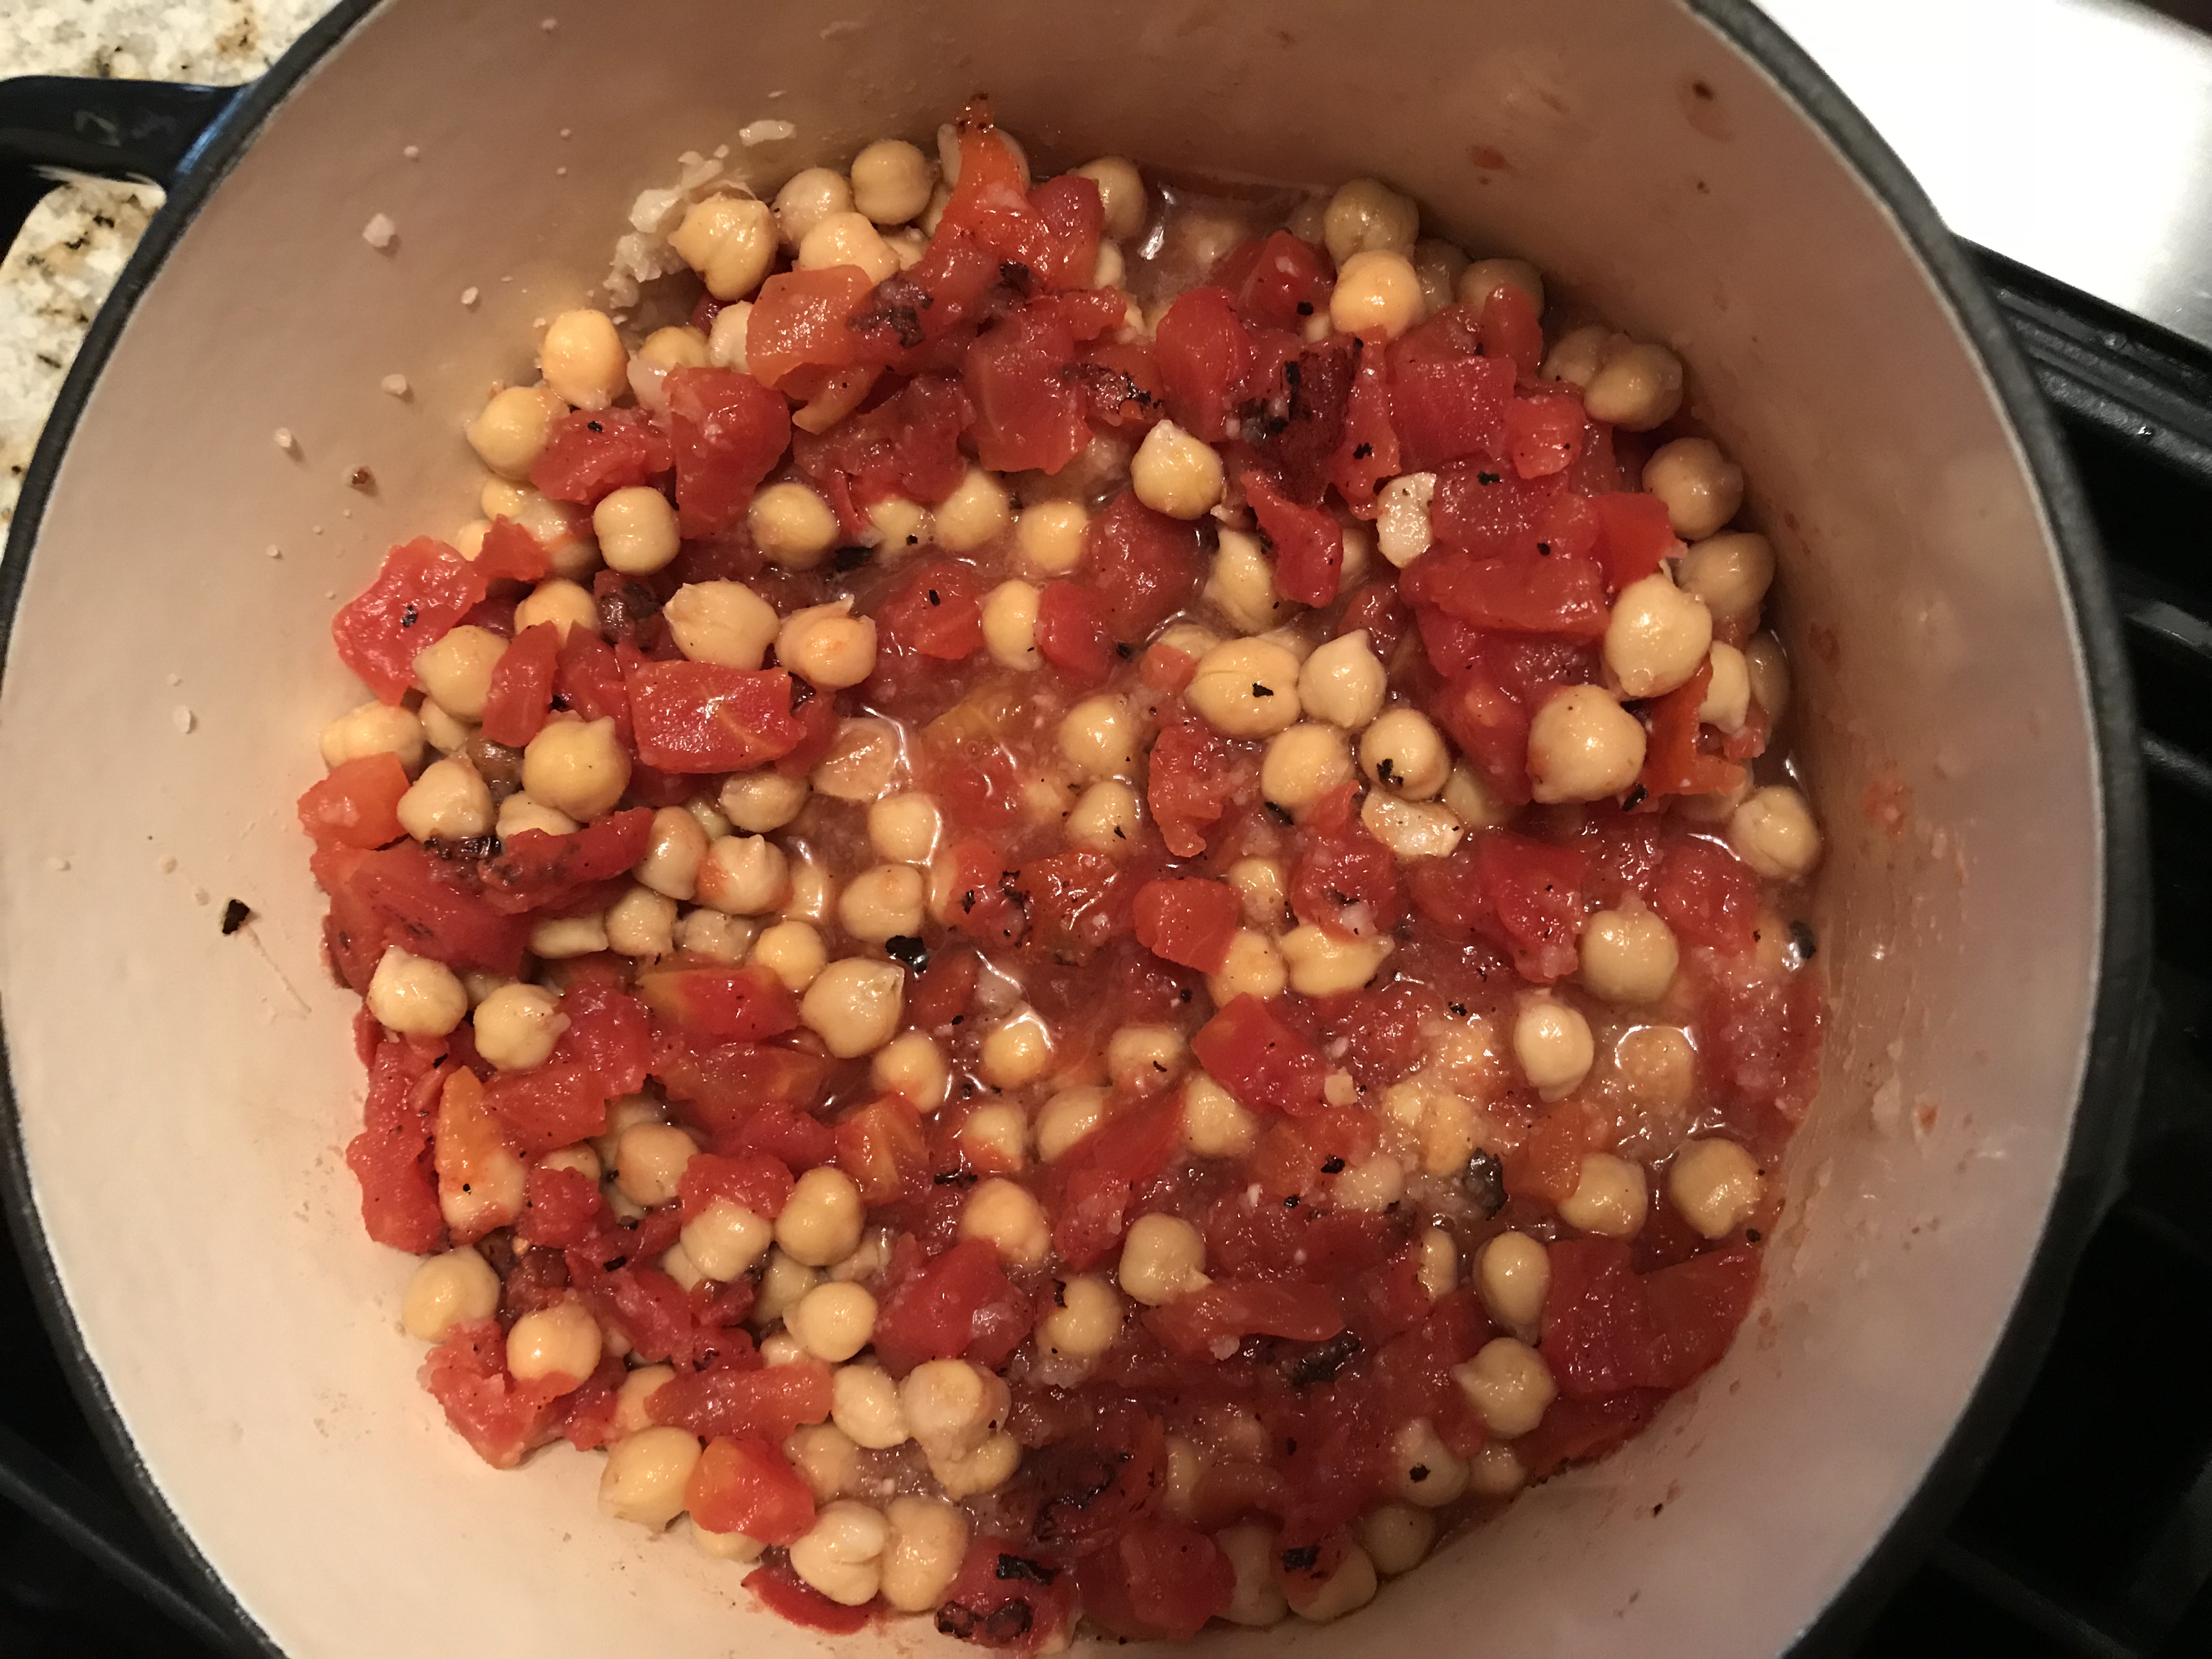
Pour the mixture into a large pot. We’re going to layer flavors now into the pot. Cook the mixture over medium for about fifteen minutes, stirring occasionally.

Add the rinsed and drained chickpeas and the diced tomatoes. Cook for another ten to fifteen minutes on medium.

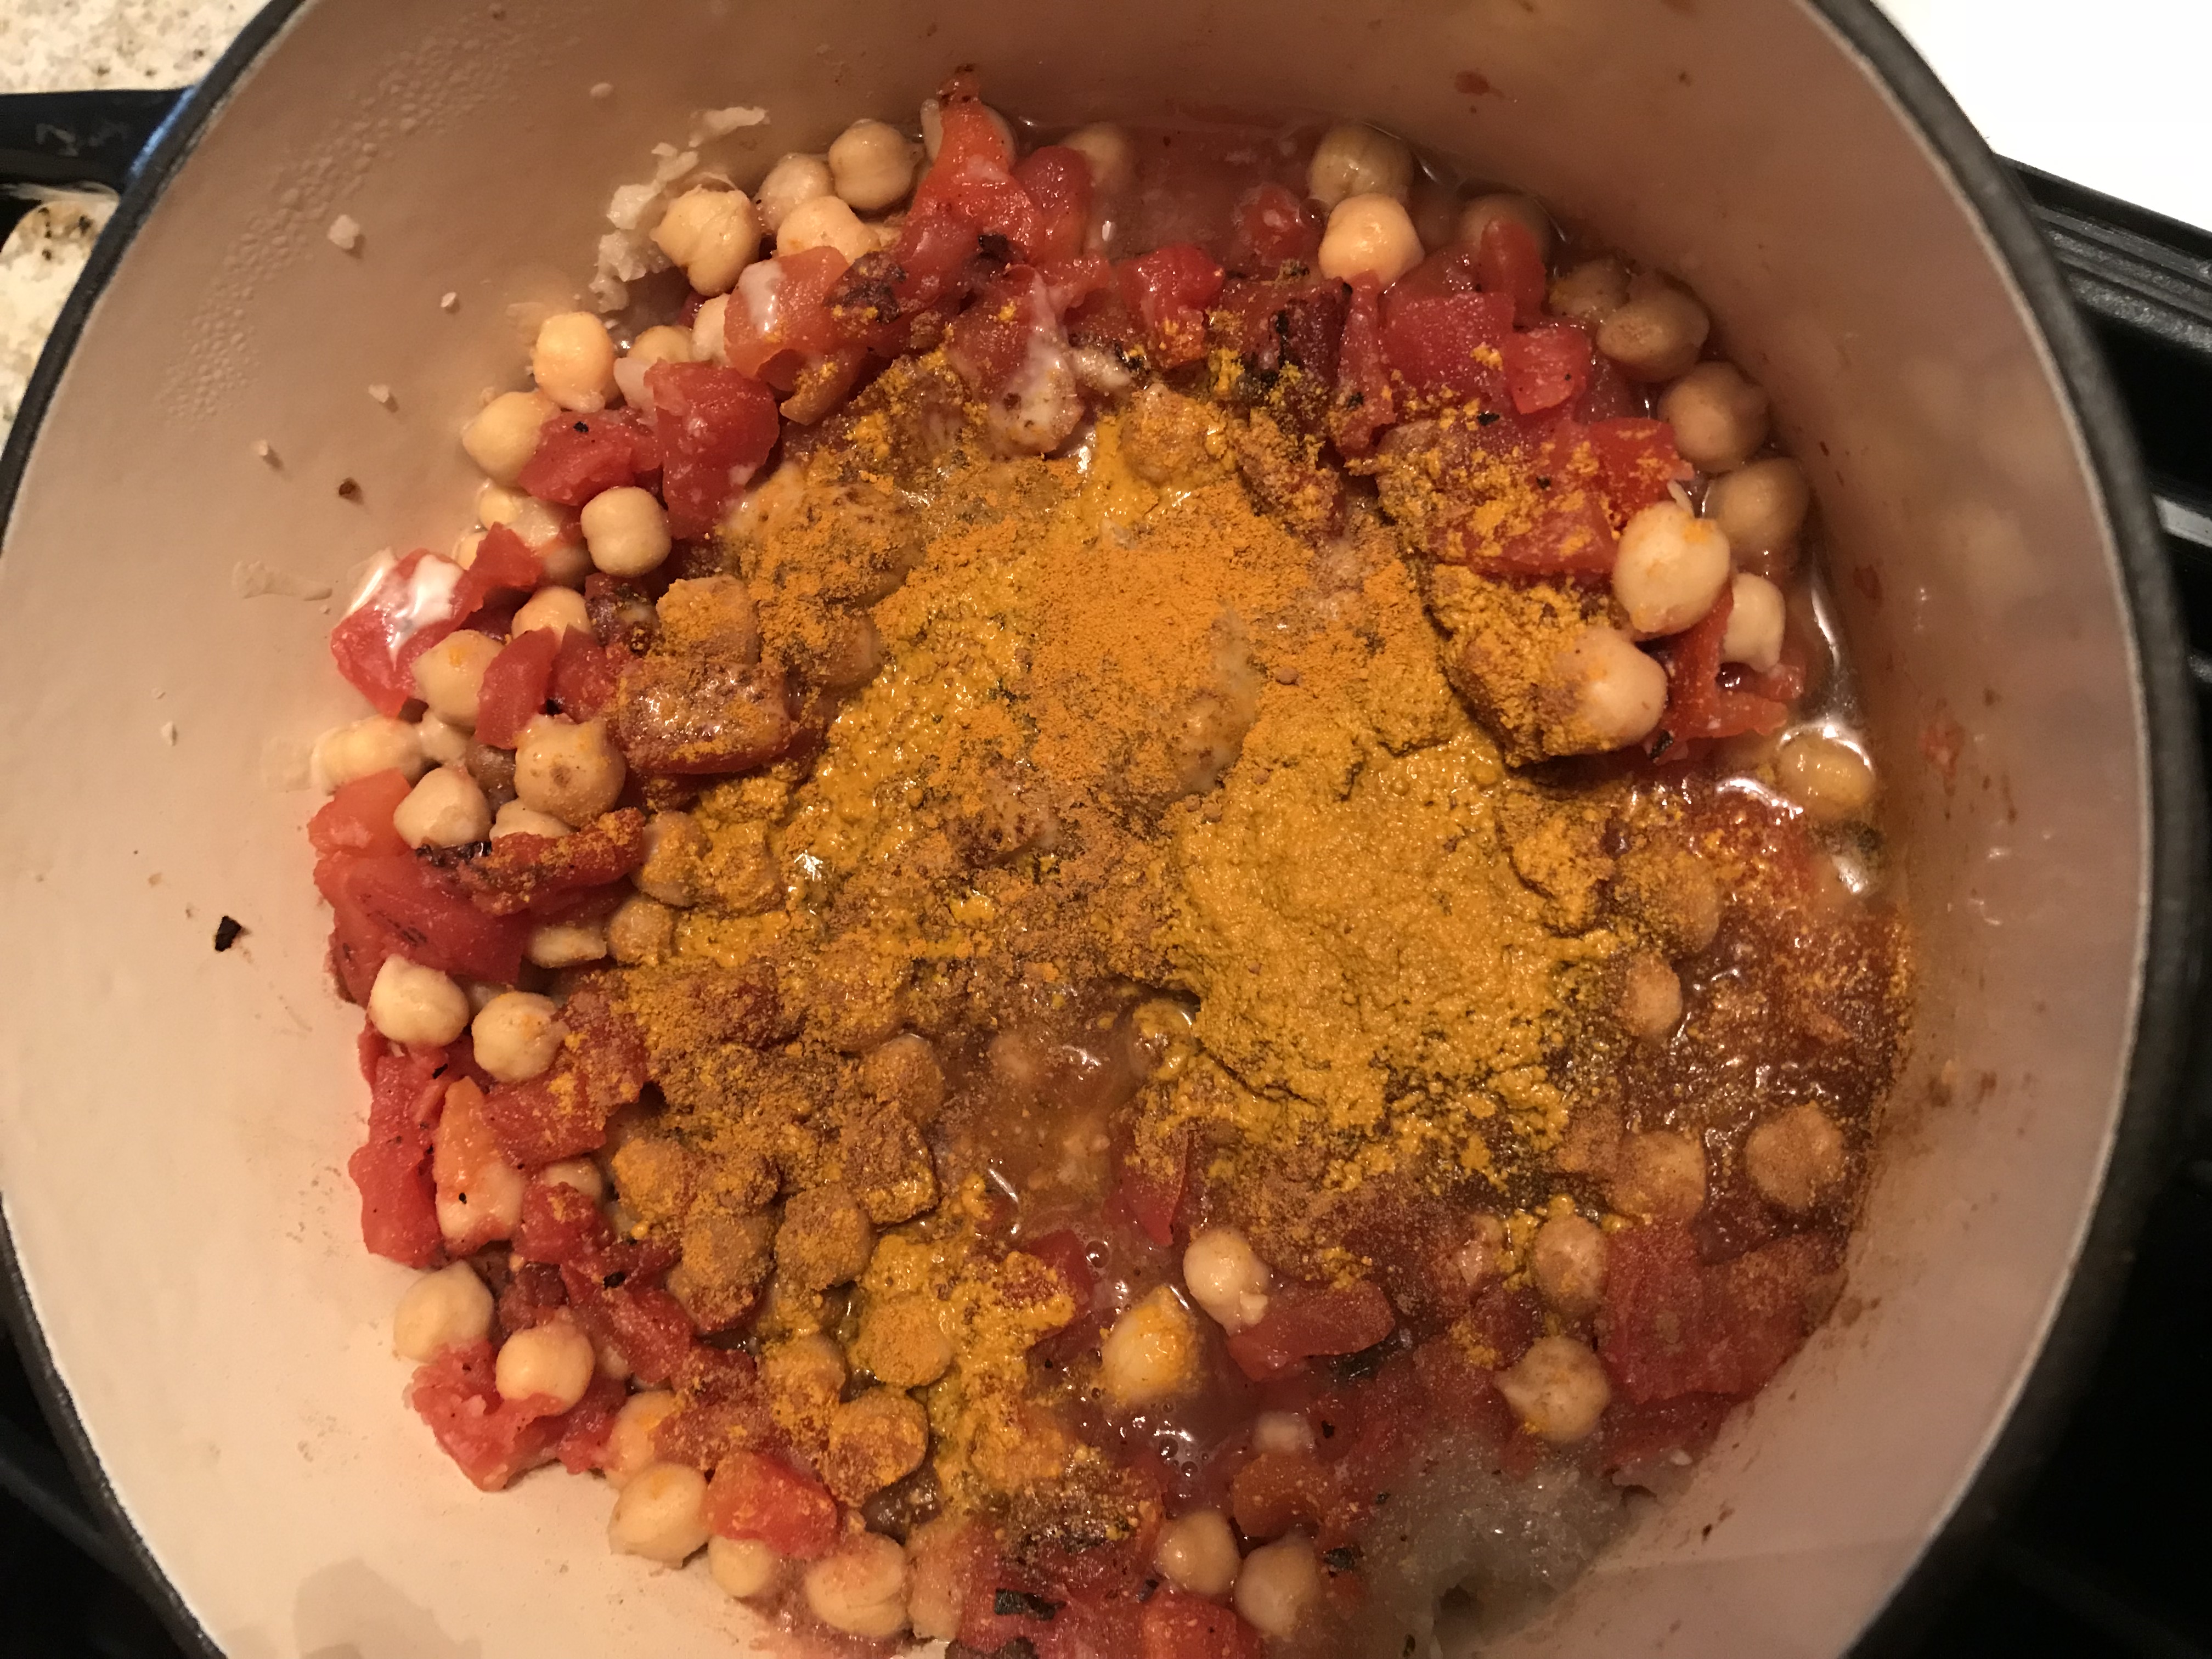
Add the tahini, salt, pepper, coriander, turmeric and cinnamon. It’s totally up to you how much to add. I’d say a teaspoon of each or so to start. The best part of cooking with so many spices is adjusting the amounts to match your flavor preferences. I go heavier on the turmeric than the other spices.


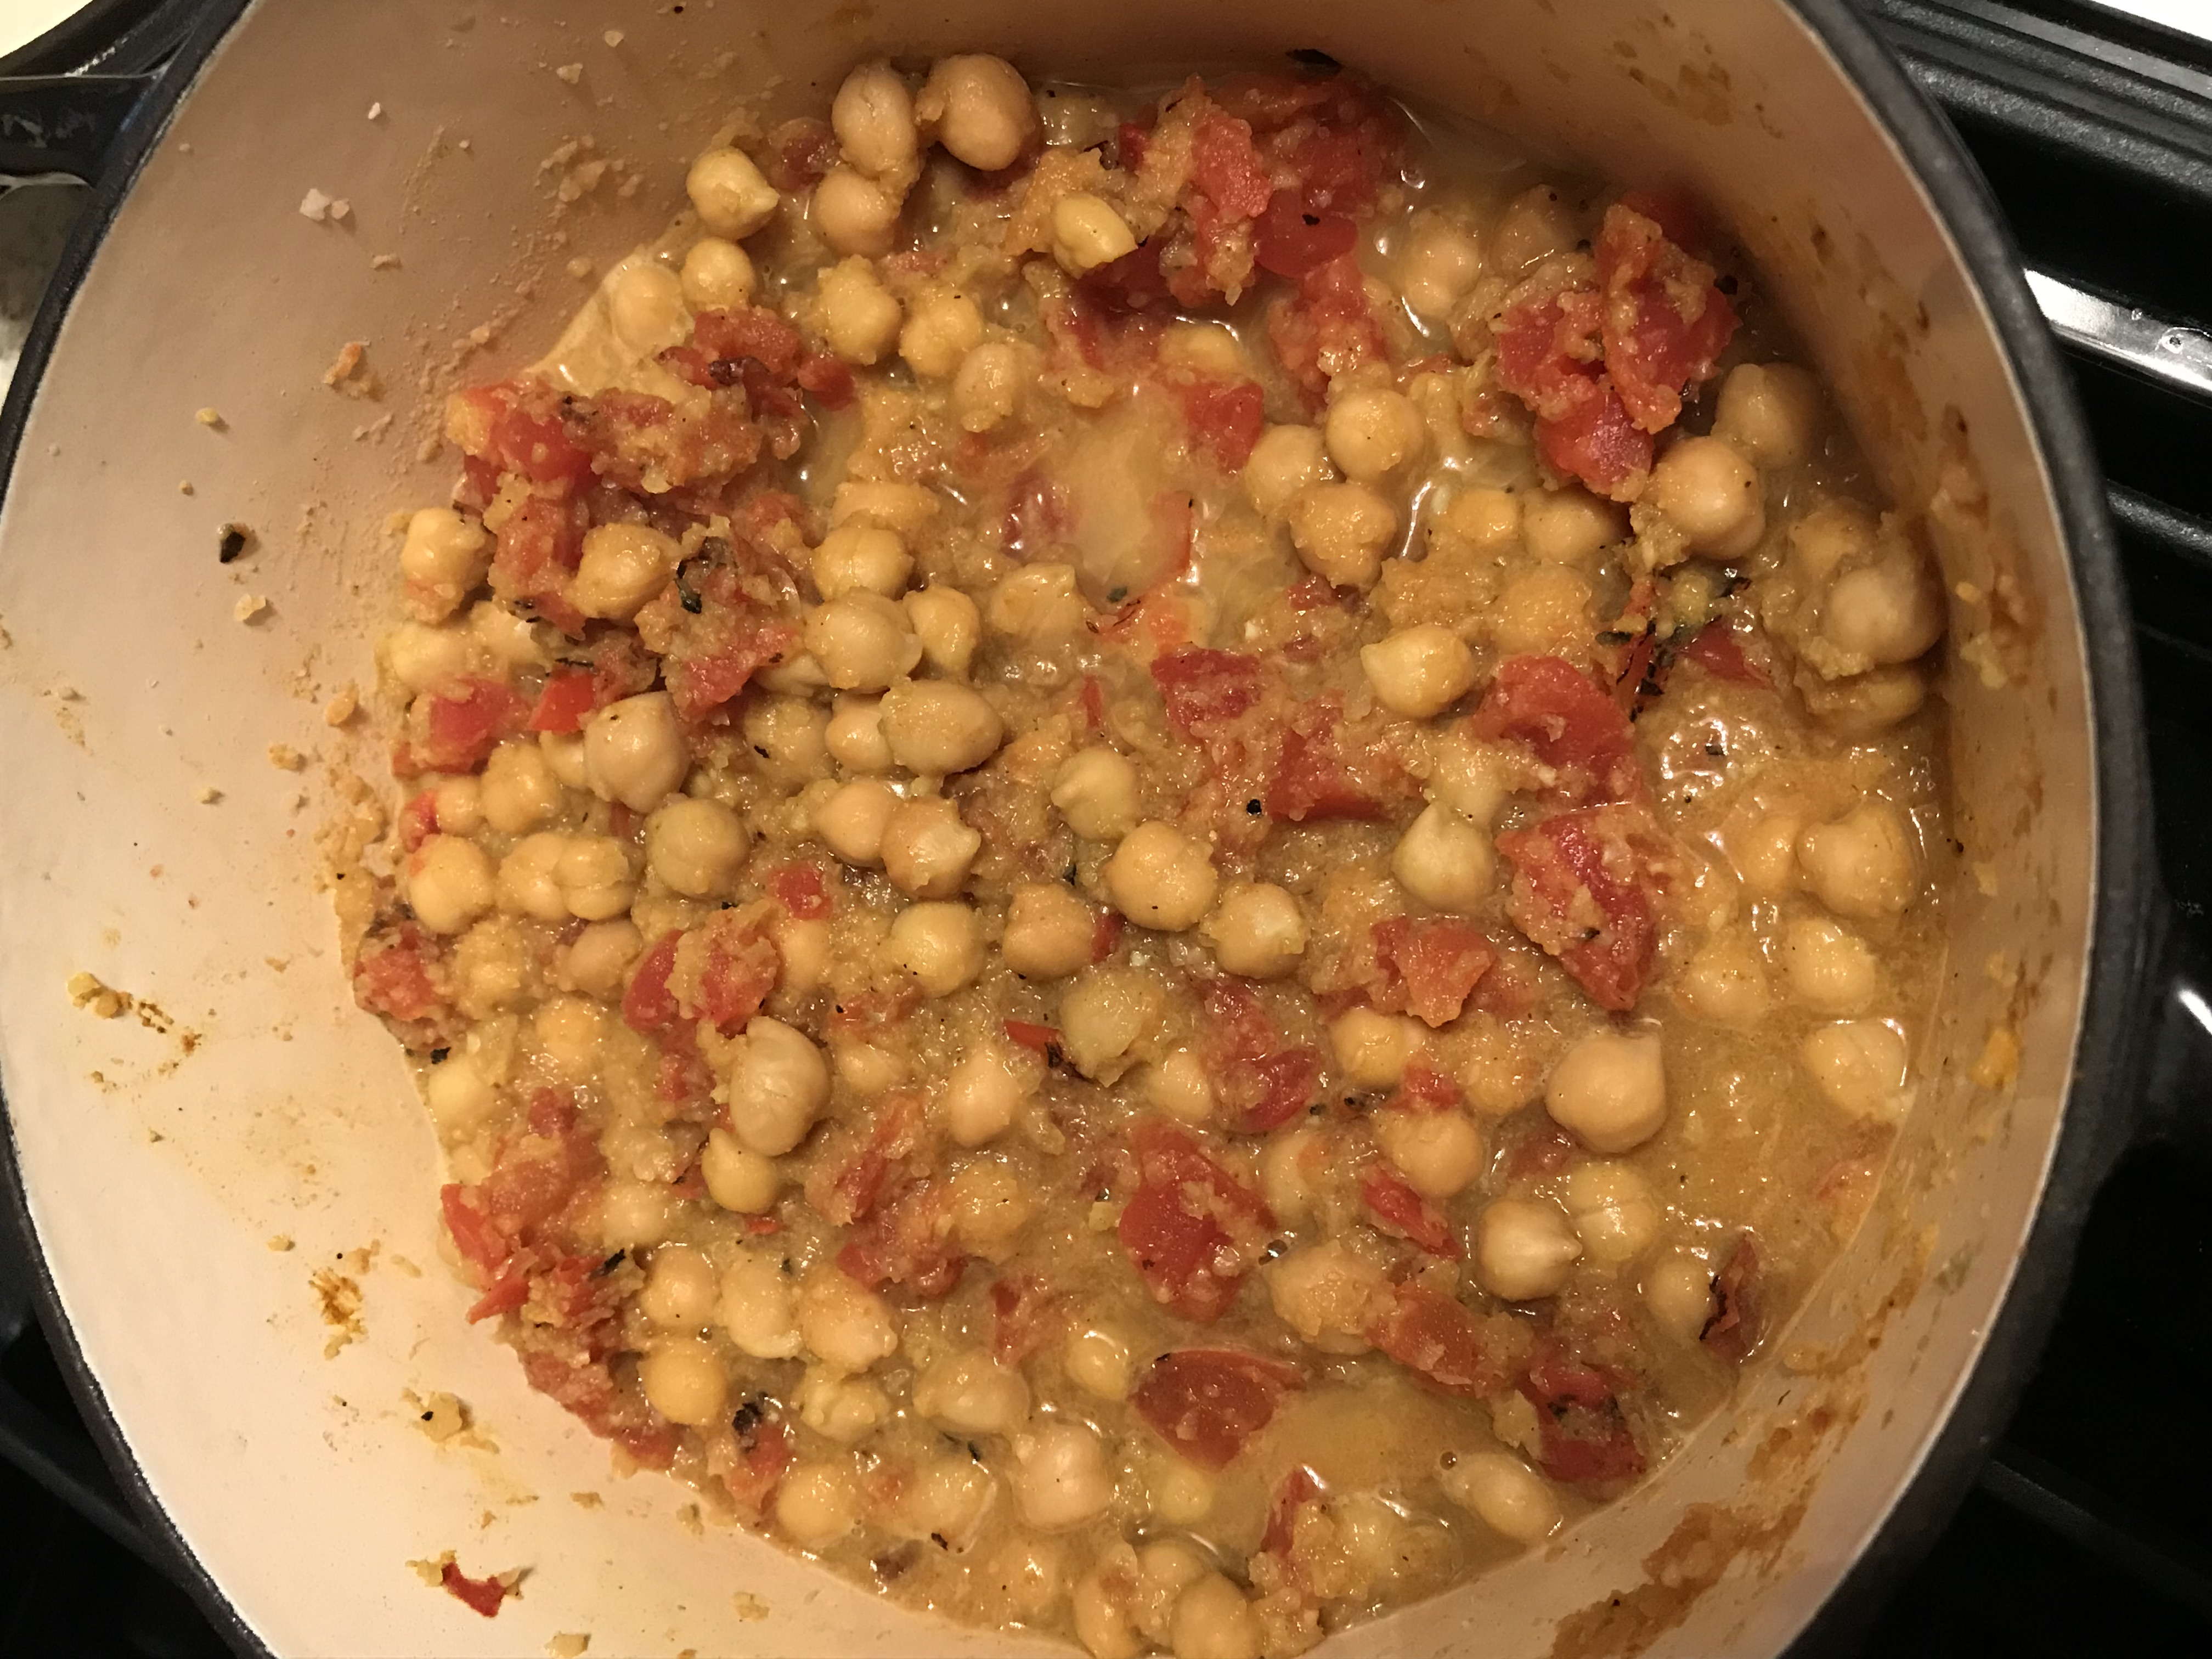
Give it a stir and let it sit for at least another thirty minutes.

We served ours over rice pilaf and topped with a scoop of yogurt.

Potato Skin Bites

Now that we know who will be facing off in the Super Bowl, we can turn our attention to more important game day matters- The Menu!

Let’s be real, Super Bowl Sunday is as much about game day eats as it is about the touchdowns and tackles on the field.

A friend of ours made this incredible little potato skin bites at a party over the summer, and I knew that they would be perfect with a big pot of chili for game day.

Typically, potato skins are kind of a pain to make and to eat. You bake the potato. You hollow out the potato. You fill the potato. You bake the potato again. Then you go to pop one and they really aren’t a poppable snack. They’re a two-three biter, and may even require a knife and fork. That’s why these little guys are perfect for the game. They’re as poppable as potato chips but a million times better.

Super easy to make too!

You will need

  • 4-5 baking potatoes (I made two cookie sheets worth of potato skin bites from this)
  • 1 stick of butter, melted
  • shredded cheddar cheese (or monterey jack)
  • scallion, sliced thinly
  • bacon bits

Preheat oven to 400.

Cover baking sheets in foil.

Take your washed potatoes and start slicing them into 1/4 inch rounds.

Take each slice and dunk it into the melted butter.

Place the butter-dunked potato on the cookie sheet.

Continue until all the potatoes have been dunked in butter.

Pop in the 400 degree oven for about 15-20 minutes, flip, then bake for another 15 to 20 minutes.

Remove the golden brown potatoes from the oven and top each slice with cheese, scallions and bacon bits.

The cheese almost immediately starts melting into the potato.

Place the cookie sheets back in the oven for about 3-4 minutes, just so the cheese melts into the potato.

I made these at a party recently as a test run for game day. Good thing I snagged one when they came out of the oven before putting them out because they were gone almost instantly.


Veggie Quesadilla

We make tacos a lot in our house.

Usually once a week.

They’re easy. They’re versatile. And they can be made to be relatively healthy if you load ’em up with veggies.

As much as I love tacos, I kind of wanted to do something different.

Since it’s football season, I also wanted to do something that was a little more couch friendly and had a little more of a bar food vibe.

Quesadillas. Bingo.

Cheesy. Handheld. Packed with veggies. Satisfies the need for a healthy dinner that’s also Monday night Football friendly.

You can use a different combination of vegetables. You could also add, say, some shredded rotisserrie chicken or even leftover slices of steak if you wanted to add meat.

Here’s what I used for the filling:

  • Two green bell peppers, julienned
  • Two poblano peppers, julienned
  • One onion, julienned
  • One can of black beans, rinsed and drained
  • One can of corn, rinsed and drained
  • White button mushrooms, sliced

You will also need tortillas, taco seasoning and Mexican cheese blend. You can also add fixin’s like sour cream, salsa and guacamole.

You’re going to want to use a fairly large skillet for this.

Start with vegetable oil or avocado oil (I love this Avocado Oil from Thrive Market)

Add your peppers and onion to the pan and saute until soft.

When the peppers and the onion have softened, add the mushrooms.

Mushrooms are super absorbent so you may need to add more oil. Be sure to stir so everythign cooks evenly.

When the mushrooms have browned, toss in the beans and corn and add your favorite taco seasoning. Or add your own blend of seasonings and spices.

Give everything a stir and let it come together for a few minutes.

In the meantime, let’s get the Quesadilla assembly started.

Line a pan with foil. This is going under the broiler, so use a pan that can stand up to the broiler.

Lay down two tortillas and add a hefty layer of cheese.

Spoon on your veggie mixture

And add more cheese

Pop this under the broiler for a few minutes, until the cheese melts. Do not walk away from the oven. This goes from perfectly melted to burned rather quickly.

Add another tortilla on top and get into fourths. Quesdaillas cut into fourths is a requirement. I don’t even think you can call them quesadillas unless they’re cut into triangles.

Add whatever toppings you like. Guacamole, salsa and sour cream were our toppings of choice.

This amount of mixture ended up making four quesadillas, so for us that translated into two nights of dinners from one pan!

Our New (Still Itty Bitty) City Kitchen

I haven’t been posting a lot lately.

But that’s becuase I haven’t been cooking a lot lately.

We spent much of our summer closing on, doing work on and moving into our new apartment.

We’re still in the city.

And my kitchen is still Itty Bitty.

But it’s got a smarter layout and a few more cabinets. Yay storage.

Here it is actually.

I also was really excited to have more counter space.

Until I realized that the fancy hood over the stove meant there was no microwave/vent combo that i had grown used to.

Which meant that we’d have to put a microwave on the counter.

Which meant that I’d lose counter space.

But Dad to the rescue!!

He came up with this awesome idea to use all thread, some nuts and a shelf we had that actually matched the cabinets perfectly.

Holes drilled into the cabinet; holes drilled into the shelf, all thread and some time getting it all level, and voila!

Can’t wait to share with you from our new kitchen!

Egg Roll in a Bowl

When it’s hot in New York, I sometimes start running out of ideas for dinners.

I want something that doesn’t involve standing over a stove forever.

I also want something that’s light, but still satisfying and filling.

For some reason, that leads me to noodles.

I love brown rice noodles. They cook in minutes and they are so versatilei.  could happily just throw some scallions and sesame oil on them an call it a night.

But

1. That would only feed me.

2. That would only feed me tonight

3. That would leave me with a hungry husband

4. That would leave me with a hungry me AND a hungry husband come lunch tomorrow.

I don’t know about you, but when it’s hot, I like my cooking adventure to give me more than one meal.

So. A noodle-based dish that will leave us with leftovers.

I started googling and found a couple variations of deconstructed egg rolls or egg rolls in a bowl. I took some inspiration from those recipes and added a few of my own twists.

For this recipe you will need

  • 8 oz brown rice noodles ( I love Annie Chun’s) or you can sub for brown rice
  • 1 white onion, diced
  • 1 pound ground pork
  • 1 bag shredded cabbage (the dole coleslaw mix is always in my fridge)
  • 2 shredded carrots (you can leave these out. I had them on hand)
  • scallions, chopped (up to you how much)
  • 1 tbsp garlic chili sauce
  • 2 tbsp soy sauce
  • 1 tbsp sesame oil
  • 1 tbsp rice vinegar

The last four ingredients I’d say measure to taste. If you like really spicy, feel free to go heavier on the garlic chili sauce.

Get started with some sesame oil and the white onion in a skillet over medium heat.

When the onions are translucent, add the pork and brown, strirring occasionally.

Once the pork is brown, add the scallions and the garlic chili sauce. If you like, you can reserve some scallions for a garnish at the end.

When the scallions have wilted a bit, add in the carrots and the cabbage, stirring so the cabbage begins to wilt.

Add the soy sauce and rice vinegar and taste for seasoning. You may wish to add more soy or sesame (or even more garlic chili sauce, you heat seekers, you.)

This can sit for a bit while you boil your water and cook your noodles or rice to package directions. When the noodles are done, drain and stir into the pot of egg roll mixture.

Serve up in big bowls with a sprinkling of scallions and a drizzle of sesame oil.

We had a fairly large amount of this for dinner and a container each for lunch the next day.

I’d call that a win.

Three Ingredient Pasta Sauce

It has been forever since I posted!

Work got busy.

We were travelling a bit.

And, we’ve been apartment hunting.

Which is incredibly time consuming.

Which has meant that I’ve been making really fast dinners.

And totally forgetting to take any pictures.

Ugh.

But this was so delicious and so easy that despite the lack of photos, I think you’ll still love it.

Three ingredient pasta sauce:

  1. cherry tomatoes
  2. Bacon
  3. Red Wine

That’s it. And whatever kind of pasta you want to toss it with.

I was in a rush at the store and trying to grab a few things and get out when I saw this gorgeous carton of multicolor cherry tomatoes for $1.99. The price! The beautiful tomatoes! I had to do something with them.

So i brought them home, sliced them in half and then rummaged in the fridge.

We had 4 pieces of bacon left over from when we had BLTs. So I diced up the bacon and fried it in a pot.

When it was cooked, i tossed the halved tomatoes into the pot with the bacon and let them cook down in the bacon fat. You can drain some of the fat off, but really, why?

Stir occasionally. The tomatoes will start to burst open and the juices will mix with the bacon.

I wanted a little more liquid so I looked around and grabbed the open bottle of red wine on the counter.

A few glugs, lowered the heat and let the pot simmer.

The wine added a richness that made it taste like the sauce had been cooking all day. Reality:20 minutes.

Boil water, cook whatever kind of pasta you want and toss with the sauce.

Don’t be afraid to plan a meal around one ingredient that just looks incredible in the store. Trust your senses. If it smells good and lookgs good, it’s probably in season and probably will taste its best.

Lemon Scones

It’s been rainy and dreary here in New York. So we definitely needed something yummy, and warm and comforting.

But it’s also almost Spring (or at least it should be feeling like Spring, ahem, Mother Nature).

So I was thinking of a recipe that would be good for a rainy day but would also hint at the coming of Spring.

My thoughts immediately turned to scones. What’s better on a rainy day than a warm, buttery scone and a mug of tea?

Nothing! That’s right.

But how to spring-ify that scone?

I don’t know about you, but spring always makes me crave bright, citrusy, lemony desserts.

Bingo.

Here you have super simple, super warming scones, topped with a bright lemon sugar.

For the scone recipe you will need:

  • 1.5 cups flour
  • 2-3 tablespoons sugar (depends on how sweet you want them)
  • 2.5 teaspoons baking powder
  • .5 teaspoon baking soda
  • pinch of salt
  • 5 tablespoons unsalted butter
  • 2/3 cup reduced fat buttermilk

Topping

  • zest of one lemon
  • 2-3 tablespoons sugar

Preheat oven to 400.

Mix together the dry ingredients and then add five tablespoons of cold butter.

Using a pastry cutter or two knives combine the butter with the dry ingredients.

Then make a well and add the buttermilk, stirring until the ingredients come together. You may have to get in with your hands and knead the dough a bit.

Let the dough sit for a minute while, in a bowl, you combine the lemon zest and some sugar to make your lemon sugar topping.

Break off roughly baseball sized balls of dough, loosely form in a ball and press the top into the lemon sugar.

Arrange on an ungreased baking sheet.

Bake for 15 minutes or so.

Buttery, warm, comforting scones with a bright lemon zing.

Come on Spring!

Revisiting Helen’s Cinnamon Rolls

My dad’s mom had six kids, never had a driver’s license and was an amazing cook.

Odd facts to give you, I know, but it helps paint the picture.

She had six kids, so had a lot of mouths to feed.

She also did not have a driver’s license so couldn’t run out to the store whenever. This meant

a. she had to use what was on hand

and

b. she was home all day and had a lot of time while the kids were in school

Every Monday during football season she made cinnamon rolls.

Every Monday.

I really only bust this recipe out for the holidays because

a. it’s a bit labor intensive

and

b. it’s not really itty bitty city kitchen friendly.

But for Christmas, you need cinnamon rolls. And so I turn the dining table into a dough rolling station and get flour all over the living room floor.

I’ve actually posted this recipe before. But I confess that I actually spent some time tweaking it.

GASP

I know. I know.

You don’t mess with grandma’s recipes.

BUT! remember what I said a little while ago? Using what was on hand?

Well, Helen always had margarine and crisco on hand but did not always have butter. So her original cinnamon roll recipe was made with margarine, but I tried it with butter. And oh my goodness are they so much better!

So here is the revised cinnamon roll recipe.

  • 1/4 cup sugar
  • 1 teaspoon salt
  • 1/4 cup butter, room temperature
  • 1/2 cup scalded milk
  • 1 package dry yeast
  • 1/2 cup warm water
  • 3 and 3/4 cup all purpose flour
  • 1 egg, room temperature
  • extra margarine for greasing the dough
  • 2 tablespoons melted butter for brushing the dough
  • cinnamon
  • brown sugar
For the glaze:
  • 1 cup brown sugar
  • 6 tablespoons butter
  • 4 tablespoons hot water
Okay. To get started combine sugar, salt, butterand scalded milk in a large bowl.
Scalded milk is milk heated to just before boiling.
 Dissolve the yeast in a half cup of warm water
When the yeast mix is lukewarm, add it, half the flour and the egg to the sugar, butter and milk mixture.
Continue to stir and incorporate the flour until all of it has been added.
Turn the dough ball out onto a floured surface and knead for a few minutes.

Grease the dough ball with butter, then place back in the bowl, covered with a towel in a warm place.

Let the dough rest and rise for 1 and a half hours.

It will double in size.

Then, punch the dough down, cover and let sit for another 15 minutes. It will rise a bit again.

Now we are ready to get rolling! Preheat the oven to 350.

Flour your work surface. Here’s where the dining table comes into play in our house.

IMG_1514

Roll out the dough into a rough rectangle. We’re going to roll it up like a jelly roll so you want it to be fairly thin.

IMG_1518

Brush the dough with melted butter and sprinkle with brown sugar and cinnamon. Be generous.

Starting at one ed, carefully roll it up.

IMG_1521

Leave the dough to sit for a minute while we make the glaze.

In a sauce pan, heat one cup of brown sugar and four tablespoons of hot water, stirring until the sugar is dissolved.

IMG_1516

Add 6 tablespoons of butter and stir until melted.

IMG_1517

Pour this sauce into the bottom of a greased 9×13 baking tray.

Stay with me on this one.

Slice the cinnamon roll log up – I got 16 rolls out of this dough – and place the slice rolls in the tray on top of the sauce.

IMG_1522

Bake at 350 for 20-25 minutes. The rolls will absorb the glaze and will puff up.

Let them sit for about 5 minutes so the glaze sets up on the rolls.

Flip.

Enjoy!

Here’s a side by side pre flip so you can see the difference between the butter and the margarine. The left is butter and the right is margarine. The left one just got puffier and fluffier. And let’s face it, buttery-ier. Which is always more betterer

50490851887__d071e00c-b1e0-4fd0-81e9-c17669003bc9 IMG_1526

Halloween Cookies- Pumpkin Snickerdoodles

I love fall. I love the weather turning chilly. I love sweaters. I love changing leaves. I love cinnamon. And I love pumpkin.

I was thinking about cinnamon which led me to thinking about snickerdoodles. (recipe here). I really associate those cookies with Christmas, though, so I started thinking about how to fallify them. And landed on pumpkin.

So, here are my pumpkin snickerdoodles.

For this recipe you will need:

  • 2 sticks salted butter, at room temperature
  • 1 cup sugar
  • 1/2 cup light brown sugar
  • 3/4 cup canned pumpkin puree
  • 1 egg
  • 2 teaspoons vanilla
  • 3 3/4 cups flour
  • 1 1/2 teaspoons baking powder
  • 1/2 teaspoon salt
  • 1 teaspoon cinnamon
  • plus more cinnamon and sugar for rolling

This dough is really easy to make. Just keep in mind it needs to be refrigerated for 1 hour before you roll and bake your cookies.

To make the dough, start by creaming two sticks of butter.

img_6222

When the butter is fluffy, add sugar, brown sugar, pumpkin, vanilla and egg and stir to combine.

img_6223

In a separate bowl, mix your remaining ingredients (flour, baking powder, salt and cinnamon) and slowly add the dry ingredients into the wet.

img_6224

Stir until combined

img_6225

At this point, the dough needs to go into the fridge for at least one hour.

…Time lapse…

Preheat the oven to 350, grease two cookie sheets and take your dough out of the fridge. in a small bowl, mix together cinnamon and sugar. I tend to a 2:1 sugar : cinnamon ration, but mix to your taste.

img_6226

Let’s start making cookies! I made roughly ping pong size balls of dough and wound up with 6 dozen cookies.

Roll the dough into a ball

img_6227

Roll the dough ball into the cinnamon and sugar and place on the cookie sheet.

img_6228

When your cookie sheet is full, lightly press down on the dough balls to flatten them. These cookies don’t spread, so flattening them is necessary.

img_6230

Bake at 350 for 11-13 minutes.

img_6235

The best part? The house smells like pumpkin pie. The bestest part? You get to eat cookies that taste like pumpkin pie. And who doesn’t love a cookie?

And the bestest bestest part? You’ll have 72 cookies to share with friends or coworkers.

Happy Halloween!

Shrimp and Grits

When we were in South Carolina earlier this year, we were sure to eat our weight in that good Southern food that just isn’t quite the same above the Mason Dixon line.

With no trip to the South planned any time soon, though, and a craving for some shrimp and grits, we had a problem.

So, my husband and I put our heads, and our kitchen skills together, and tag teamed an awesome shrimp and grits dinner.

img_5157

It’s actually a fairly simple recipe that you can tweak to fit your craving or flavor profile.

We kept ours fairly classic with cheddar, bacon and scallions, but this could easily take an Italian turn with Parmesan and garlic, or have more of a Mexican flair with some green chiles and pepper jack cheese.

So for this recipe you will need:

  • 1 cup grits (or polenta)
  • 3 cups water
  • 1 cup shredded sharp cheddar
  • 3 slices bacon
  • 1/2 pound shrimp (frozen works great. Cleaned, deveined, shell off, tail on)
  • scallions

Get started by preparing your grits according to package directions. Ours called for boiling 3 cups of water and then adding in the grits, stirring and leaving on the stove for twenty minutes with the lid on.

In the meantime, prepare your shrimp mixture. Start by placing your bacon, cut into small pieces, into a frying pan and cook until crispy.

img_5150

Remove the bacon from the skillet, but leave the grease. Place the shrimp into the bacon grease. Hey, this is a Southern dish. We’re cooking with bacon grease y’all.

img_5151

Cook the shrimp, turning to cook on both sides, until they are pink.

img_5152

When the shrimp are cooked, add the bacon back in. Also add in your chopped scallions. Lower the heat and let everything warm through.

img_5154

Meanwhile, add the shredded cheddar to your cooked grits and stir until it melts in.

img_5153

Serve up a a few big spoonfuls of grits in each bowl and top each with half the shrimp mixture.


img_5156

And there you have a five ingredient Southern Fix!